
Recording a Goods Receipt (GRN)
A goods receipt note (GRN) records what physically arrived from a vendor. It's the step that matters most for stock: confirming a GRN is what adds the accepted quantities to your inventory — nothing enters stock before that.
Starting a receipt
There are two ways in:
- From the purchase order (recommended): open the PO's detail page and click Create Goods Receipt in the sidebar. The form opens with the PO linked, the vendor set, and every PO line pre-filled with its ordered quantity.
- From scratch: open Purchases → Goods Receipts and click New GRN. You can then link a PO from the Purchase Order dropdown (it lists approved orders; picking one fills in the lines and vendor), or leave it unlinked for an ad-hoc delivery.
Steps
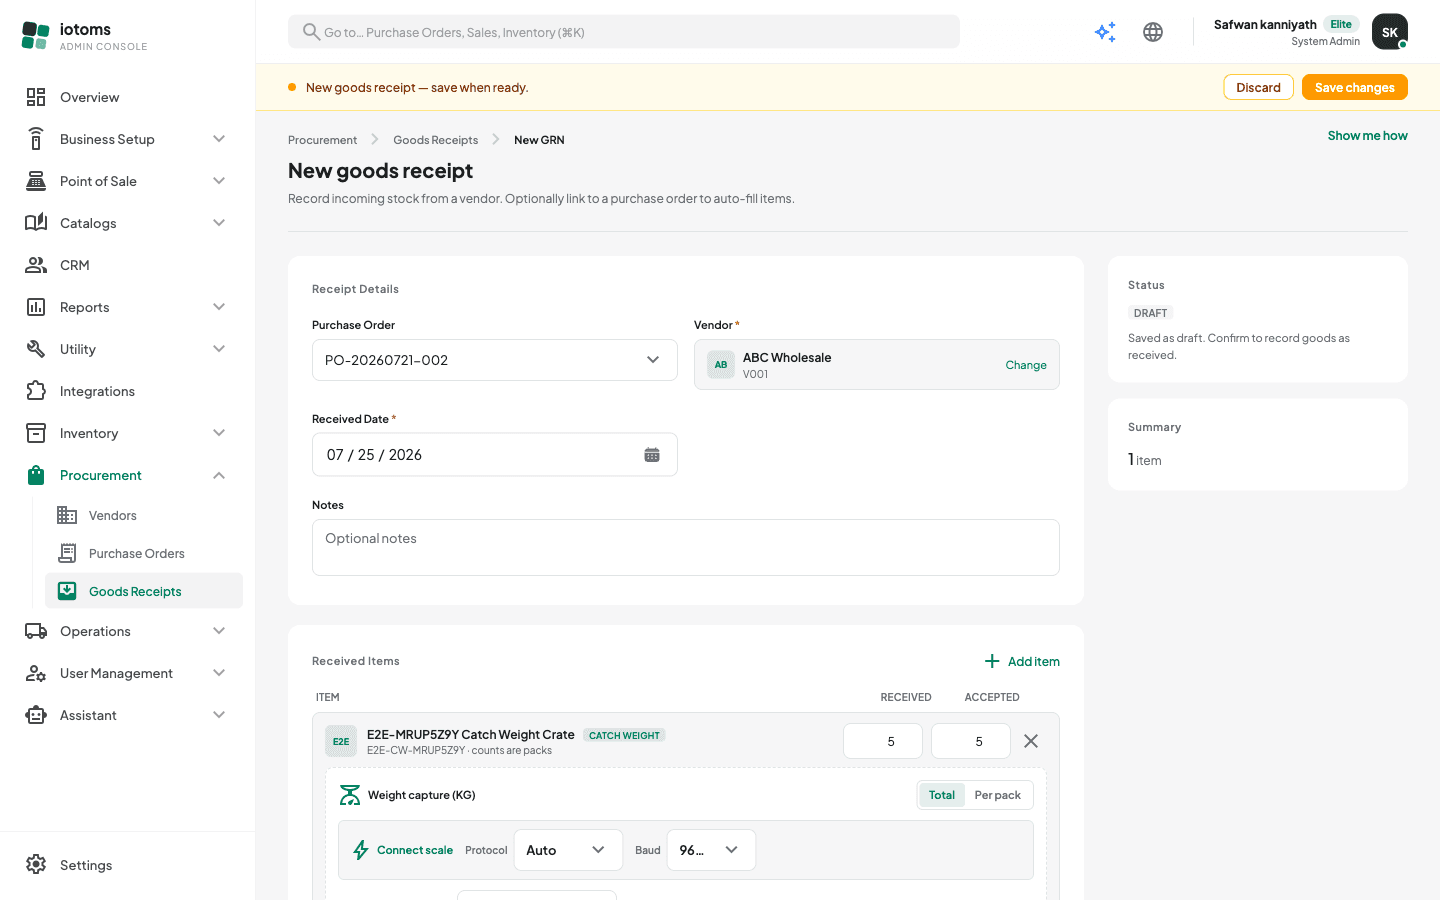
- Make sure a Vendor is selected (required) — click Select vendor… if it wasn't filled from the PO.
- Check the Received Date — it defaults to today.
- Review the Received Items lines. For each item, enter:
- Received — the quantity that arrived.
- Accepted — the quantity you're taking into stock. Lower it below Received if part of the delivery is damaged or wrong; the difference is recorded as rejected.
- Add extra items that arrived outside the PO with Add item, and remove lines with the ×.
- Add any Notes, then save from the amber bar at the bottom. The receipt is created as a Draft — inventory has not changed yet.
The New GRN page has a Show me how link that replays a short guided tour of this form.
Catch-weight items
Lines for items stocked by measured weight show a Catch weight badge, and their Received/Accepted counts are whole packs. Each such line gets a weight-capture panel where you must record the scale reading before saving:
- Enter one gross total across the accepted packs, or switch to per-pack mode and enter each pack's gross reading.
- Optionally record the gross weight of rejected packs — it stays on the GRN as evidence for a vendor credit.
- If a supported bench scale is connected, use the panel's connect control to stream stable readings straight into the fields.
The server nets out packaging (tare) weight and posts the net weight of accepted packs to inventory. A variance against the expected weight is shown after confirmation — it's flagged when large, but never blocks receiving.
Confirming the receipt
- After saving, you land on the GRN's detail page in Draft status.
- Review the quantities, then click Confirm Receipt, type your name, and press Confirm.
- Inventory is updated with the accepted quantities, and the linked PO's Received/Outstanding columns update. Confirming cannot be undone.
Made a mistake on a draft? Click Cancel GRN instead — a cancelled receipt makes no inventory changes. Then record a fresh one.